Product Description
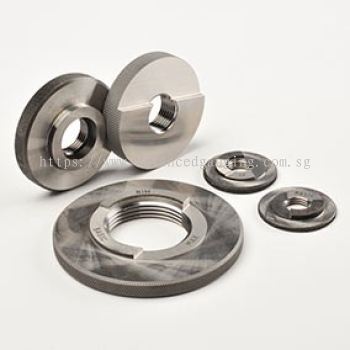
Thread Plug Gauges are manufactured as a one piece gauge.
Thread Ring Gauges are manufactured as a one piece gauge.
-
NPT Taper Plug and Ring Gauges to American National Standard ANSI/ASME B.1.20.1 - 1983. The main types of threads designated are NPT, NPSC and NPSM.
-
Taper Plug and Ring Gauges to BS21 and ISO7/2 Gauges for testing pipe threads where pressure tight joints are made on the threads.
Technical Specifications
NPT Taper Plug and Ring Gauges
Gauges for testing threads to American National Standard ANSI/ASME B.1.20.1 - 1983.
This standard covers dimensions and gauging of pipe threads for general purpose applications.
The main types of threads designated are NPT, NPSC and NPSM.
The significance of each letter is as follows:
N = National (American) Standard
P = Pipe
T = Taper
C = Coupling
S = Straight
M = Mechanical
NPT Threads
Threaded fittings made to this standard consist of an external taper and an internal taper to form a joint having general purpose applications. These threads are intended to be made up wrench-tight, with a sealant whenever a pressure-tight joint is required.
The taper of the thread is 1:16 on diameter, normal to the axis. The pipe fittings range in size from 1/16 inch to 24 inch.
Provision is made for two types of gauge.
Master gauges: used to check working gauges.
Working gauges: used to check product threads during and after manufacture.
A set of master gauges
consists of a taper plug with a gauging notch located at L1 distance from the small end. The ring gauge has an overall length equal to the L1 dimension. This ring is fitted to its mating plug seating flush at the gauging notch. It should be understood that only a specifically matched set of masters (L1 plug and L1 ring) can be expected to assemble together within a stand-off tolerance of +/-0.002 inch as specified.
A set of working gauges
consists of a taper plug gauge having a basic step at L1 distance from the small end, and a taper ring having an overall length equal to the L1 dimension. Plug and ring gauges can be supplied with limit steps to indicate the minimum and maximum diametral condition of the product. These gauges are known as MIN/MAX. The basic steps can be included or omitted as requested.
The L1 dimension is the axial distance from the small end of the pipe to the plane of handtight engagement.
NPSC Threads
These are parallel internal threads only in pipe couplings, and have the same thread form as the NPT thread. They are used to form pressure tight joints when assembled with NPT external threads, and made up wrench-tight with a sealant.
The threads range in size from 1/8 inch to 4 inch.
Go/No Go parallel plug gauges can be supplied to test the diametral limits of these threads, although the standard states that NPT taper plug gauges should be used to test the internal product thread where the mating external threads are tapered and a pressure tight joint is required.
NPSM Threads
These are parallel threads, internal and external. The basic thread details correspond with NPT threads at the plane of handtight engagement.
Free fitting mechanical joints are used for special applications where there are no internal pressures. NPSM threads range in size from 1.8 inch to 6 inch.

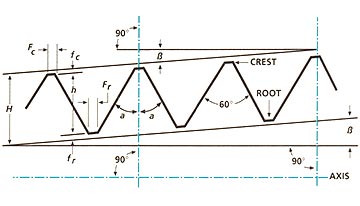
Notation
H = 0.866025p = height of 60deg. sharp V thread
h = 0.800000p = height of thread on product
p = 1/n = pitch (measured parallel to axis)
n = number of threads per inch
a = 30deg. = thread flank angle
ß = 1deg. 47 min. = thread taper angle for 1/16 taper
fc = depth of truncation at crest
fr = depth of truncation at root
Fc = width of flat at crest
Fr = width of flat at root


